For those of us who have plenty of space for chickens to roam around in the garden, you probably do not need to build one of these DIY chicken tunnels, then. Your chickens already have plenty of space to run around
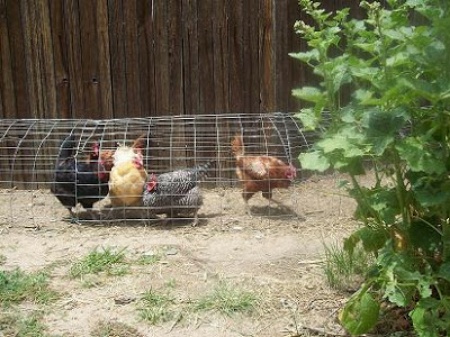
Urban homesteaders usually have very limited space in their backyards. The chicken tunnel, also commonly known as ‘the chunnel’ allows the chickens to roam around the backyard freely, whilst keeping them away from yoour garden.
-------------------------------------------------------------------
Here’s What You’ll Need:
- fencing stakes
- galvanized hardware cloth
- u shaped metal or wire supports (optional)
- wire cutter or electric saw (optional)
- metal or wooden panel (optional)
Step By Step Instructions
Step 1
Plot the route your chicken tunnel is going to take around your backyard.
The easiest thing to do is just let it run along the perimeter or fence from the coop.
Step 2
Open up your hardwire and put into place along the plotted route, using the
fencing stakes to secure it to the ground for long term.
Step 3
Attach it to one side of your coop, and create an opening so that your chickens
can have easy access to the tunnel when they need to use it.
It’s simple. That’s all there is to it!
You can insert a slide up and down metal or wooden panel at the entrance of the tunnel. This will allow you to control access to the chunnel, only letting your chickens out during the day or when you see fit.
Don’t just leave your chickens cooked up in the coop all day long, give them the freedom to roam around almost like free range chickens. Who doesn’t love freedom? We all do! 🙂
Click here for some pictures of a completed chunnel to inspire you.
.